A couple of weeks ago I decided to sit down and determine the exact state of affairs in regard to my 1951 201K. It worked, and everything moved freely, so I didn't have a huge restoration job like those who have frozen machines.
I wanted to fit a new needle, a standard 90 universal, and in doing so realised that the needle system was a good indication of how dirty the machine was. After a lot of gentle coaxing, the thumb screw finally gave way and I could discard the old rusted needle. Next, I examined the hinged presser foot, it was cruddy, and the hinge was tight. The presser foot shank was really stuck, and very difficult to remove, but I got there.
Not enough people talk about how dirty, smelly, and gross a vintage sewing machine can be. I don't do anything by halves, but even I had to draw the line at dismantling the whole thing and scrubbing every piece of metal.
Do click each image to zoom in and get a really good look at the yuck.
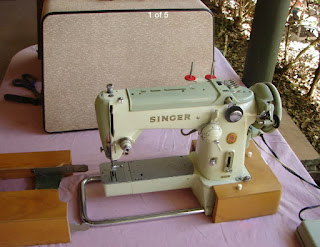
 |
| My machine before cleaning. |
I'll talk a bit about my cleaning process, everyone has a different approach, but as I'm in Australia many of the most common products discussed online are unavailable to me, so I have decided on the following:
- Grime: A homemade vinegar+detergent solution on a cloth gets a lot of dirt off, followed by baby wipes (use cheap alcohol-free ones).
- Oils: D-Solv It, a citrus-based sticky stuff remover. Safe on my 1951 decals, but YMMV.
- Rust: A few minutes soak in a oxygen-based laundry booster, plus a wiping with D-Solv It removes a lot. Bad parts get a rust conversion treatment using Ranex.
- Metal: I use AutoSol metal polish for most things, but have also found Purple by California Custom to be very good.
- Wood: Pale Boiled Linseed Oil is marvelous. I apply thin coats (maybe 4) with a thin cloth pad.
- Head Finish: Boiled linseed oil combined with some shellac it will make the machine head shine and give some protection if you follow this process.
Head basic cleaning: I wiped the head down with a cloth dampened with some vinegar and detergent. I then lightly rubbed the entire head with D-Solv it.
 |
| Grime, old oil and lint, just touching any part of the machine was sticky. |
Old oil removal: I am using citrus oil, a product called D-Solv it. I use a paintbrush or cotton tip to apply it, and then wipe it off, and repeat. After the old oil is gone, I briefly soak the parts in a bit of Vanish - a oxygen-bleach laundry stain remover power. This ensures the D-Solv residue is stripped. Next, the newly cleaned part is given a film of sewing machine oil. Some parts of the machine were totally gross:
 |
| Before: The stitch selector cover was actually still stuck on with a ring of sticky oil after I removed the screws. I used a lot of D-Solv it here. |
 |
| Before: Golden-brown oil film everywhere. |
I really found D-Solv it helpful on the metal, and I swabbed every part even after soaking in Vanish. The worst old oil was like hard wax, and needed repeated rubbings to soften and remove it.
 |
| Before: The grimy bobbin area and feed dogs. This was taken after I removed the initial brownish-green carpet of lint and dust... |
 |
| After: So much cleaner, I found pitting from surface rust, and treated each area with rust converter. |
In the next photo you can see how the tension assembly gleams white compared to the dirty machine innards:
 |
| The bright and clean tension assembly. |
My lovely spoked balance wheel was in a poor state, with chipped enamel and a lot of rust. If you zoom into the very first photo of this post, you can get a good idea of it 'before'. I didn't like to touch its rough surface, and didn't think I could do much to improve it. But, I polished it first with Autosol, and then with Purple, and after a couple of hours (and an aching arm and cramping fingers) it was a lot brighter and smoother:
 |
| After: Cleaner and a lot nicer to touch. |
I re-shellaced the enamel to try and help preserve it and prevent further chipping:
 |
| After: One coat of shellac and the balance wheel is already glossier and smoother. |
The underside of the machine was awful. I used a million baby wipes.
My spool pins were rusty, but I took some wet/dry sandpaper to them, and with just a drop of water the rust was removed and the pins are silver again.
Treadle stand: My treadle irons are completely rusted. Only surface rust, but a lot of it. I originally planned on trying Ranex rust converter unless further research determined otherwise.
 |
| Before: Rust and unknown white grossness. |
The irons began to bother me. I phoned around town and got some sandblasting quotes, one engineering firm quoted me $130, which I thought excessive, but had no knowledge to base that opinion on. I eventually found a wonderful semi-retired owner of a different engineering firm who did the job for me very carefully for only $20. I was so thrilled!
 |
| After: Carefully sandblasted. All moving springs, rods and bearings had no damage. |
I am going to paint the irons with a rust-inhibiting paint in a darker brown colour than the original brown paint. I'm going to give it a couple of coats with a small brush, as spray paint would just get where it shouldn't and cause problems.
Wooden table top: The wood is in sound condition with only a few small veneer lifts. The wooden table surfaces have some bruising, bumping and stains. I have used 0000 steel wool and O'Cedar to shift the light dirt from the thirsty wood, and made repairs to the lifting veneer by gluing and clamping.


Comments
Post a Comment